
Behind The Stitch | Episode 4 | Double Crochet

Updated: Jul 22
Hello Everyone!
If you’ve seen my YouTube channel, you’ll have seen the latest video I’ve uploaded for you guys. That’s right! I’ve gone back to the crochet tutorials! It’s been a long time coming. I was supposed to make this video years ago, but work and life got overwhelming, I had to stop filming for a while. Anyway, I’m back, and we’re picking up where we left off. So, before we start, watch the video first, and if you still need more context, you can keep reading.
Video
So, as you can see, we’re learning about the double crochet, and a little bit about what an increase is. Now, if the video is too fast for you, or if you’d still like pictures, then read on.
First The Abbreviation
As usual, we’re starting off with the abbreviation for the stitch. Like I said in the video, it’s normally the initials of the words. So, for a Double Crochet, the abbreviation would be…
DC
Easy right? Ok, let’s test what you already know.
2DC in the next St, and Ch1, what would you do?
You would make 2 Double Crochets in the next stitch and then make 1 chain.
Did you get that without reading ahead? Good. Then, let’s give you a little more of an exercise here.
So, I’m going to give you a simple pattern that you can try, once you’ve learned how to make the Double Crochet (DC).
To start 31Ch. This is your foundation chain.
Row 1. In the 2nd St from your hook, 1SC. Repeat 1SC for the rest of the foundation Ch. Turn. (30St)
Row 2. Ch1 and in the same stitch, 1HDC. Repeat 1HDC for the rest of the row. Turn. (30St)
Row 3. Ch2 (count as DC), in the next stitch, 1DC. Repeat 1DC for the rest of the row. Fasten off. (30St)
How did you do? Did you understand the pattern?
If you did, great, we can now move on and learn how to make a DC.
How To Make The Double Crochet
So, now we know the abbreviation, let’s look at making the stitch. Firstly, let’s start at the beginning of a pattern. As usual, I will start with a foundation chain of 10 chains (Ch10).

Now, before we start making the Double Crochet (DC), we’ll need to make 2 extra chains (Ch2), so we have a nice even row of Double Crochets (DC).

Once we have that, we need to yarn over (YO), just like we did for the Half Double Crochet (HDC).

Here comes the tricky part, you’re going to need to insert your hook into the 3rd Chain (Ch) from your hook.
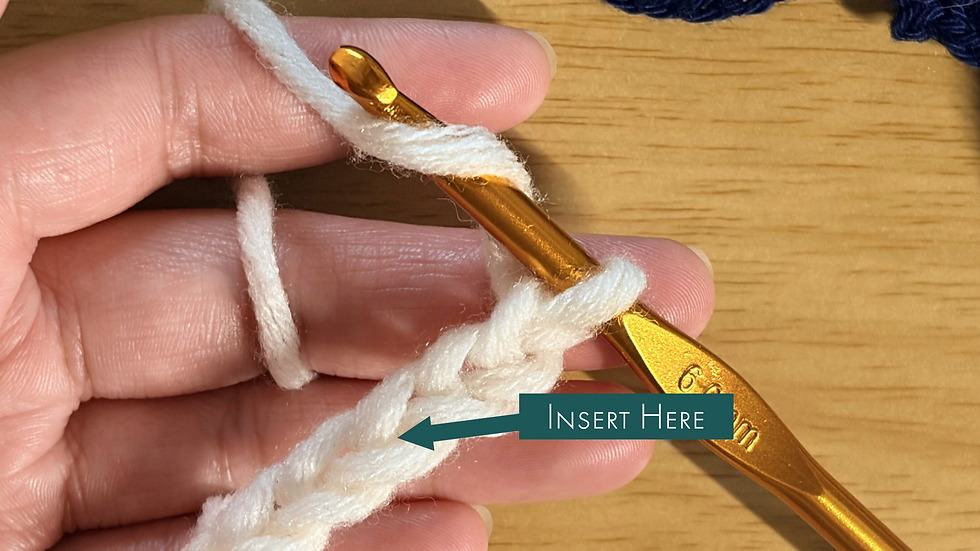
With me so far?

Now that we’ve cleared the first hurdle, you need to yarn over (YO) again.

Next, bring that yarn through the chain (Ch), and only the chain.

So now, you should have 3 loops on your hook.

Are we still good?
Good. You should know what this is now, yarn over (YO).

Here comes the next tricky part, bring the yarn through the first 2 loops on your hook.
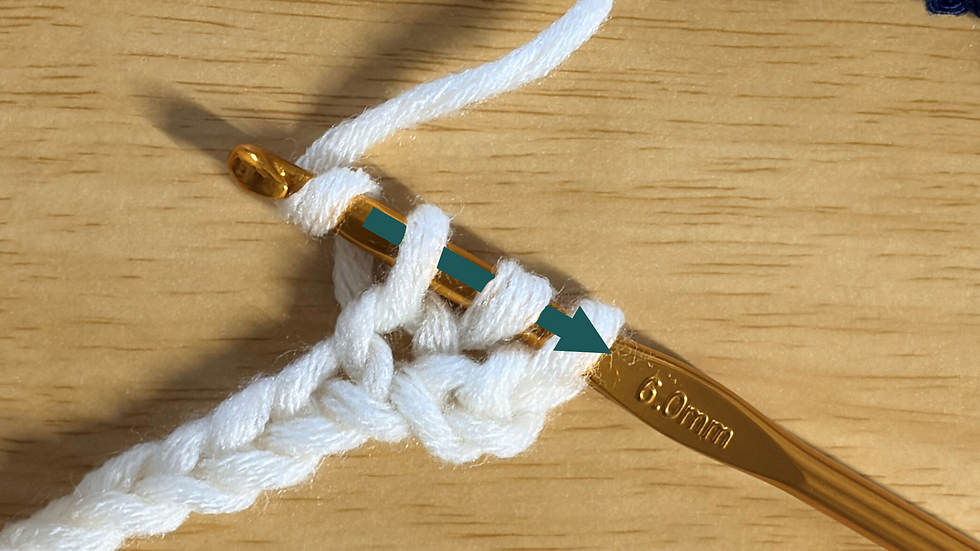
You should now have 2 loops left.

Yarn over (YO) one more time.

And finally, bring the yarn through the last two loops.

Et voila! Your first double crochet!

Now all you need to do is rinse and repeat, to finish the row.

How To Start A New Double Crochet Row
Ok, we now know how to make a double crochet, it’s time to learn how to make a new row. So, like we did at the very beginning, you’re going to need to make 2 chains (Ch2).

Here comes the tricky part for this section. We’re not going to be using the stitch where your turning chain, or your pseudo-double crochet is coming from. Remember, we talked about turning chains last time? If you haven’t checked that post out, go and take a look. It’ll tell you why we don’t do this.
Instead, we’re going to insert our hook in the next stitch, into the gap where the arrow is pointing.

Let’s begin.
First, yarn over (YO).

Then insert the hook into the next stitch.

Yarn over (YO) again.

Bring the yarn through the stitch.

You should now have 3 loops on your hook.

Yarn over again (YO).

Bring that yarn through the first 2 loops on your hook.

Yarn over one last time (YO).

And bring that yarn through the last two loops on your hook.
And there you go! You can now create the rest of the Double Crochet (DC) row like normal.

Remember, at the end of the row, you'll still have the extra 2 chains you made, when you started. You'll need to Double Crochet (DC) in the top of those 2 chains.

Let’s Talk About The Increase
There are many different types of increases, and it depends on what your pattern is, what sort of increase you use. For the most part, increases are easy, because they are literally exactly what they’re called. They are an increase of stitches in your pattern.
Let me demonstrate this.
Let’s say, I’ve made a single crochet (SC) piece with 10 stitches. You can see them numbered clearly here.

Now, I’m going to not listen to my own advice, and Double Crochet (DC), into the same stitch (St) as the turning chain, before continuing on with creating 1 Double Crochet (1DC) in each of the next stitches (Sts).

Ok, so, let’s break this down a little bit. For the beginners, let me ask you, how many crochet stitches do you see in this new row?
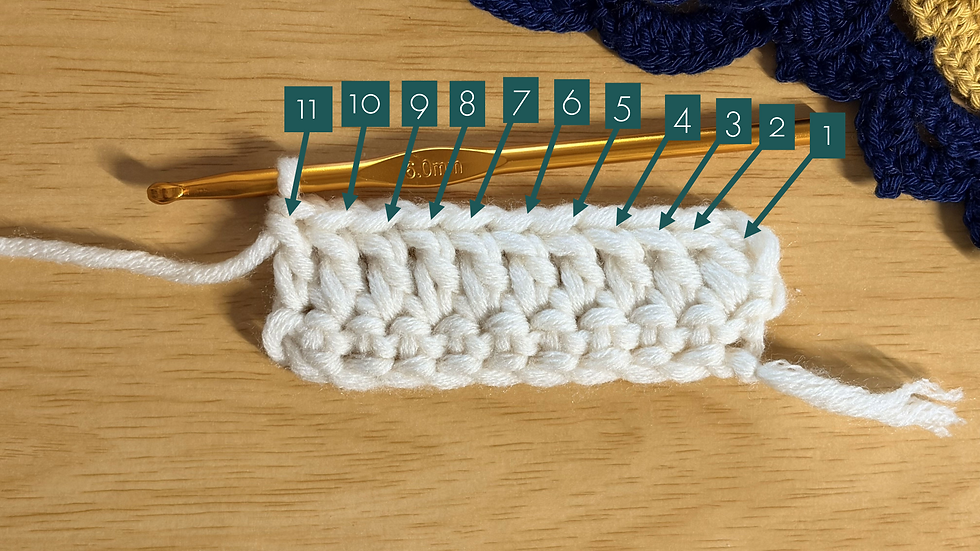
Did you count the turning chain as well? If you did, you’ll notice I now have 11 stitches (11Sts) in this row. That is why we don’t create a Double Crochet (DC) in the same stitch as the turning chain, unless the pattern requires it. This is essentially an increase, because it increased the number of stitches in my pattern by 1.

Similarly, if we make an increase in the middle of a row, it’ll do the same thing and may be a little more noticeable than an increase at the beginning of the row.
The Many Uses Of An Increase
An increase isn’t just a means to add more stitches to a row. It helps when making many different things, like round placemats or doilies, plushies and balls, and even clothing. Increases can be as basic as creating 2 of the same stitch, in the same stitch, or as complicated as creating actual textured patterns or lace patterns.

Most of the time, these increases are balanced out elsewhere by using decreases (we’ll get to this in the next episode) or smaller stitches. However, if the increases aren’t balanced out, then you’re essentially creating a ruffle, and your project will end up looking crinkled.

So, if you’re thinking about creating your own patterns, and you’re using increases, just be sure you do the math, and know when to balance out those increases, in your pattern, so you don’t overdo it, and create a ruffled piece, unless you want to. On the other hand, if you’re following a pattern that uses increases, be sure to read the instructions carefully. As I mentioned in the video, some increases can be complicated, and the designers of the pattern will outline what they want from you, when you make them. Don’t cut corners or skip these instructions, unless you know the math (because yes, math is involved in crochet).
We Did It! We Know What A Double Crochet Is!
The Double Crochet (DC) is probably the most used and the most popular crochet stitch in the crochet world. Once you know how to make one confidently, you’ll find them everywhere, especially if you’re making granny square pieces. Don’t worry, we’ll get there eventually. For now, you can be proud that you learned how to make a double crochet! You’re awesome!
Ok, before I leave you, let’s recap what we learned. We learned:
What the abbreviation for the Double Crochet is
How to make a double crochet, both at the beginning of a pattern, and in the middle of one
What an increase is, and what it’s used for.
That’s a lot to learn, especially for beginners, so be proud you made it this far. In fact, I’m proud of you, for learning all of this. Next time, we’ll talk about the treble crochet, and what a decrease is. I’ll also touch on what to do at the end of a row, since I haven’t really told you about that yet.
For now, I’m going to go and work on my current crochet piece and write up the script for the next video. While I go do that, please don’t forget to like, subscribe, comment, share and follow me, here on Feather’s Charm, on my YouTube channel, on my other social media channels (Instagram, Twitter/X, TikTok), and on Patreon. Your support really helps me make more content like this, for you guys.
And as always, be kind be creative, and be unique.
I’ll see you later!
Feather, out!

Comments