
Behind The Stitch | Episode 5 | Treble Crochet

Hello Everyone!
If you’re here, then I’m assuming you’re here to learn all about the Treble Crochet. Of course, some of you might have been redirected by my latest video tutorial, on YouTube. However, for those of you who don’t know, I made a video tutorial as well, explaining everything in this post, as I teach you how to create a Treble Crochet. So, if you’d like, check that out first, before reading on.
So, now that we’re all caught up, let’s take a look at the Treble Crochet. I will essentially be reiterating to you what I said in the video. We’ll look at the abbreviation for the Treble Crochet, how to make it, and what a decrease is. Ok, enough chit-chat. Let’s get started.
The Abbreviation
So, as I mentioned in the video, the abbreviation for the Treble Crochet is somewhat different to the other crochet stitches. Where their abbreviation is the initials of the stitch, for example, Single Crochet (SC), Double Crochet (DC), Half Double Crochet (HDC), the Treble Crochet is different. The abbreviation for the stitch is…
TR
Why is it TR? Well, I assume it’s because it’s more recognisable because of the word “Treble”, but there really isn’t an explanation for it. Of course, it does make sense, considering the alternative “TC”. It doesn’t quite have the same ring to it.
Ok, it’s test time! So, let’s see if you can decipher this snippet of a pattern.
3TR in the next St, ch2.
What do you think this snippet is telling you?
If you said make 3 Treble Crochets in the next Stitch and then make 2 chains, you’re correct!
Well done!
Ok, so, I’m not going to give you a pattern this time, instead, I’m going to ask you to build on the previous one I made, in the blog post for the Double Crochet (DC), and instead of fastening off the yarn, at the end of the 3rd row, you’re going to add on one more row:
Row 4. Ch 3 (count as TR), in the next stitch 1TR. Repeat 1TR for the rest of the row. Fasten off. (30St)
Now, I know you probably can’t make a Treble Crochet (TR) right now, but once you’ve read on, and learned how to make the Treble Crochet (TR), come back and give it a go.
How To Make The Treble Crochet
Alright, now we’re at the point we all want to be. Let’s learn how to make the Treble Crochet (TR). First, let’s start with a Foundation Chain (by the way, if you’re at the point of learning a Treble Crochet (TR), then you’ll already know what a Foundation Chain is). I want you to make a Foundation Chain of 9 chains (Ch).

This is our base. Now, before we start making the Treble Crochet (TR), I’m going to ask you to make 3 more chains (Ch). This is going to act like our initial turning chain, for this row. If you don’t know what a turning chain is, check out the tutorial for the Half Double Crochet (HDC), I talk about it there.

Now, visually, you should have 12 chains, instead of 9.

Once we have our extra 3 chains, I’m going to ask you to yarn over (YO) twice.

Here’s the tricky part, because it can be difficult to determine where a chain ends and where another one begins. I’m going to need you to count 4 chains away from your hook.

In the 4th chain (Ch), the one the arrow is pointing to, I need you to insert your hook.
Are you guys still with me?
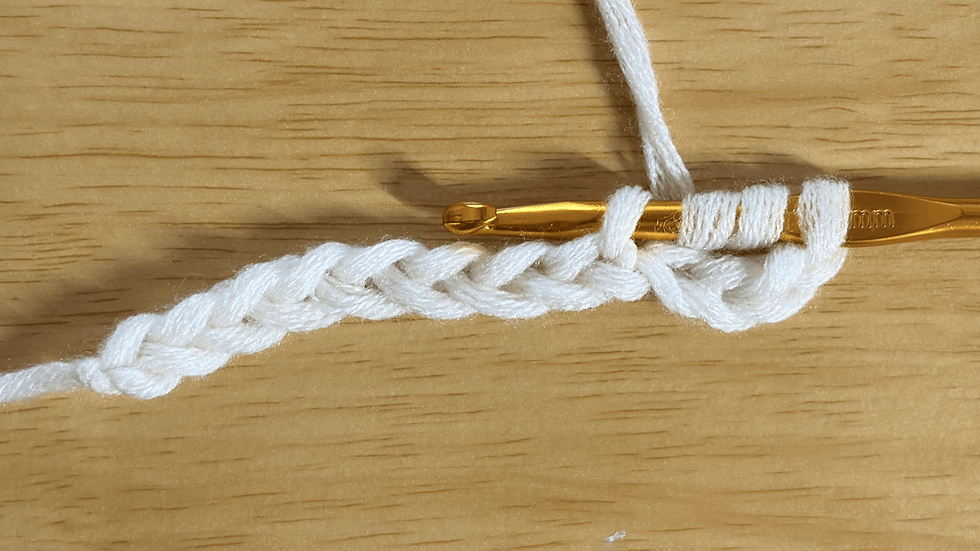
Good. So, now we’ve gotten this far, I need you to yarn over (YO), this time, only once.

Next, bring it through the chain.

At this point, you should have 4 loops on your hook.

Are you guys still there?
If you are, I need you to yarn over (YO) again.

Now, pay attention, you’re going to need to bring that new yarn over (YO) through the first 2 loops on your hook.

If you did it correctly, you should now have 3 loops on your hook.

Yarn over (YO) again.

And bring it through the next 2 loops.

Let’s take stock. You should have 2 loops on your hook at this point.

Can you guess what the next step is?
That’s right! Yarn over (YO) again.

And the last step?
Bring it through the last 2 loops!

There you go. Your first Treble Crochet!

Now, all you need to do is do the same for the next stitch, and the next one, and the next one, until you reach the end of the row.

Of course, you can repeat this row as many times as you’d like, until you’re happy to move on with other stitches, or if you’re working on a pattern right now. Go and enjoy making those tall Treble Crochets (TRs).
Note On Ending A Row
If you read my blog post tutorial on the Double Crochet (DC), then I would have briefly mentioned about the extra chains in the previous row, and how they count as a Double Crochet (DC). This is important, because if we don’t count them as a stitch, then our project will just get smaller and smaller, until you can only really create 1 stitch in your row.


What I mean by this is that those extra chains help keep our rows even, because they count as a stitch. So, when you end a row, from row 2 onwards, you need to create your last stitch in top of that turning chain, like this.

And this goes for all stitches except for the Single Crochet (SC), and more often than not the Half Double Crochet (HDC), when their turning chain doesn’t count as a stitch (because sometimes, they do, although this depends on the designer and if they choose to make the turning chain count as a stitch).
Time To Talk About The Decrease.
If you’ve seen my previous crochet tutorial, I talk about the increase. This time, we’re going in the opposite direction. We’ll be talking about the decrease, now what is a decrease, and how do I make one? Well, unlike the increase, it’s not as quick and easy to create. There are many different methods that professional crocheters and crochet designers use, and it depends on what look you’re going for, which stitch your using and how noticeable you want the decrease to be, which method you use. If you’ve watched my video, I show you how to make the simplest form, which is a Single Crochet (SC) decrease.

Essentially a decrease, like an increase, is as it’s called, it decreases the number of stitches in a row. For the most part, they decrease the stitch by one, but in most patterns, designers will need to decrease your rows or rounds by a certain multiplier, to make sure the row or round remains even. So, sometimes, you’ll find more than 1 decrease in each row or round. Let me demonstrate.

If I want to make a triangle, I need to decrease my rows on both sides of my pattern. So, say for example, I have a row of 12 Single Crochets (12SCs), I’ll need to decrease the number of stitches in the next row by 2 stitches, on either side of the piece, to make sure it decreases evenly, like this.

Can you see the decrease?

Now is it more obvious? These decreases are made by essentially completing half the steps of the first Single Crochet (SC), in your first stitch, before starting another half in the next one, and then finishing them both together. Ok, let me show you how to do this slowly.

First, insert your hook into the next stitch (St).

Yarn over (YO).

And bring it through the stitch (St).

Now, you might be tempted to yarn over (YO) again here, but don’t. Instead, I want you to insert your hook into the next stitch.


It might feel weird at first but trust me on this.

Now you can yarn over (YO).

And bring it through the stitch.

Let’s recalibrate here, you should have 3 loops on your hook now.

For the last time, yarn over (YO).

And this time, bring it through all three loops.

This is your Single Crochet (SC) decrease.

Now, there are many other ways you can make a decrease, this isn’t the only way, but it depends on what kind of project you’re working on, what kind of decrease you use. So, like always, read the pattern you’re following carefully. The designers will usually tell you what kinds of decreases they want you to use, and if you’re not familiar with any of them, don’t worry, there are plenty of tutorials online. I won’t go through them all here, otherwise, I’ll be writing an entire book on it. For now, just know that I’ve shown the most basic and most common forms of the decrease.
How Does A Decrease Look In A Pattern?
As with the decrease itself, there are many ways designers abbreviate and refer to them. The most common abbreviation for them is…
Dec
I should also note that increases can also be referred to as…
Inc
Although, most of the time, designers have specific instructions for increases that don’t always translate as “inc”. Similarly, decreases aren’t always called “dec”, there is another term that designers sometimes use, because they might deem it easier to understand. Again, there are many forms of it, but since we made the Single Crochet (SC) decrease (dec), let’s look at the abbreviation that designers might use for this…
SC2Tog
Essentially what this abbreviation means is “Single Crochet 2 Together”. Now that you’re seeing the full sentence, is it starting to make sense now? Let me put you to the test.
If I were to tell you…
DC2Tog
What do you think that would mean?
It would mean “Double Crochet 2 Together”. Simple right?
What Are Decreases Used For?
Again, like with increases, decreases are used for creating shape to flat pieces. Sometimes, it’s to make it smaller in size. Other times, it can be used to close up a flat piece, gradually, like for balls and shapes for toys, and is going to be one of the major stitches used in amigurumi patterns (patterns that rely on single crochets, increases and decreases, to create plush toys or keychain figures).
Decreases can be used in clothes as well, to add shape to the piece, like cinching waists, or creating hemlines or other parts of the piece. However, don’t always expect these decreases to be easy to spot. Sometimes, they can be complicated because the designers can use a combination of different stitches to create a decrease. So, like I said before…
Always read the pattern carefully.
Otherwise, you’ll miss the important information that will help you when you create your top or dress, or even a pair of shorts.
We’re Almost Done With The Basics!
We did it you guys! We made a Treble Crochet (TR) and learned about the Decrease (dec). Well done! I’m proud of you. It’s not easy getting this far. Not many people actually care about the other basic stitches, beyond the Double Crochet (DC), purely because these larger stitches aren’t commonly used. If they are, then they’re used for a specific reason, but that would be up to the designers to decide. I’m not one myself, so I wouldn’t know, although…maybe one day…
Anyway. We have 2 more basic stitches to learn, the Double Treble Crochet and the Slip Stitch. After that, we’re moving onto the more advanced techniques, and some other trivia about crochet that might interest you.
For now, I’m going to go and finish up my current crochet tapestry and start a new sweater for myself. While I go do that, please don’t forget to like, subscribe, comment, share and follow me, here on Feather’s Charm, on my YouTube channel, on my other social media channels (Instagram, Twitter/X, TikTok), and on Patreon. Your support really does help me make more content like this, for you guys.
And as always, be kind, be creative, and be unique.
I’ll see you later!
Feather, out!

Comments